Searching Firebase Databases
On this page
Introduction
Algolia is a great option for adding search capabilities to your Firebase Realtime Database. Algolia gives you full-text search, typo tolerance and support for more advanced features like filtering and faceting right out of the box.
The official Firebase documentation has an article on how to get started. This tutorial goes more in depth and guides you step by step into:
- doing an initial import of your data from Firebase to Algolia
- keeping your Firebase and Algolia in sync.
Prerequisites
Familiarity with Firebase
This tutorial assumes you are familiar with Firebase, how it works, and how to build Firebase applications. If you would like to learn more before continuing with this tutorial, we suggest reading the following documentation and tutorials:
Create a Firebase Application
Create a new Realtime Database, or you can use one that already exists. We’ll be using the ref contacts for the whole example, so make sure there isn’t any data there already.
Firebase authentication disabled
For the sake of simplicity, this tutorial assumes that you’ve kept the default
Firebase Database rules of read: true and write: true. It means that all
your data can be read and written by anyone. This is fine in development, but it
is strongly advised to change them to auth !== null in production to only allow
authenticated users to read and write your data.
Enabling authentication in your Firebase app is outside of the scope of this tutorial and you should check the official Firebase documentation on the subject.
Create an Algolia Application
Create a new Algolia application, or use one that already exists. We’ll be using an index called contacts, so make sure that doesn’t already exist.
Create a Node.js application
We’ll start by creating a Node.js application to import our Firebase data to Algolia. The app will be manually run from your command line to copy data from Firebase to Algolia. In the second part of this tutorial, we’ll see how to automate this.
Create a new folder, and run npm init inside it. This will take you through a wizard to create a package.json file. Accepting the defaults is ok.
Now let’s add the dependencies you will need from the command line.
1
npm install dotenv algoliasearch firebase
Configure your environment
Create a file called .env with your credentials:
$
$
$
$
ALGOLIA_APP_ID="YourApplicationID"
ALGOLIA_API_KEY="YourAdminAPIKey"
ALGOLIA_INDEX_NAME='contacts'
FIREBASE_DATABASE_URL=https://<my-firebase-database>.firebaseio.com
Make sure the Algolia API key you’ve chosen has write access. If in doubt, use your Admin API Key. Because we’re in a Node.js application and not the browser, the key will not be shared with any clients.
Create main index.js
Create a file called index.js inside of this directory. Add this code to that file:
1
2
3
4
5
6
7
8
9
10
11
12
13
14
15
16
17
18
19
const algoliasearch = require('algoliasearch');
const dotenv = require('dotenv');
const firebase = require('firebase');

// load values from the .env file in this directory into process.env
dotenv.config();

// configure firebase
firebase.initializeApp({
  databaseURL: process.env.FIREBASE_DATABASE_URL,
});
const database = firebase.database();

// configure algolia
const algolia = algoliasearch(
  process.env.ALGOLIA_APP_ID,
  process.env.ALGOLIA_API_KEY
);
const index = algolia.initIndex(process.env.ALGOLIA_INDEX_NAME);
Add initial contacts to Firebase
To test your script, you’ll have to put some data into your Firebase database. You can manually add some through the Firebase web UI, or you can use the code below to push some through your own script.
Add the following code at the end of your index.js file:
1
2
3
4
5
6
7
8
9
10
11
12
13
14
15
16
// Adding a few contacts
Promise.all([
  database.ref('/contacts').push({
    name: 'Josh',
    city: 'San Francisco'
  }),
  database.ref('/contacts').push({
    name: 'Tim',
    city: 'Paris'
  })]).then(() => {
    console.log("Contacts added to Firebase");
    process.exit(0);
  }).catch(error => {
    console.error("Error adding contacts to Firebase", error);
    process.exit(1);
  });
Save the file and run:
1
node index.js
You should see “Contacts added to Firebase” printed in the console if everything was successful. You can double check by heading to your Firebase web UI and see the contacts there.
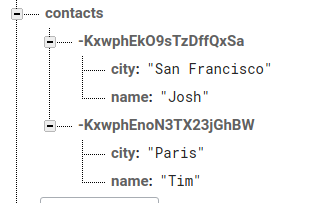
You can notice that each Firebase contact got assigned a unique identifier.
Once you’ve finished this step, you can remove the code you just added; we won’t need it anymore.
Import Firebase data to Algolia
Now that we have some data in Firebase, we will copy it to Algolia.
The following code should be added at the end of the index.js file. It will
read all data from your contacts in Firebase and push them to Algolia. Note
that it will build an array of all contacts and push the whole array in one go
instead of pushing objects one by one as this is more efficient.
1
2
3
4
5
6
7
8
9
10
11
12
13
14
15
16
17
18
19
20
21
22
23
24
25
// Get all contacts from Firebase
database.ref('/contacts').once('value', contacts => {
  // Build an array of all records to push to Algolia
  const records = [];
  contacts.forEach(contact => {
    // get the key and data from the snapshot
    const childKey = contact.key;
    const childData = contact.val();
    // We set the Algolia objectID as the Firebase .key
    childData.objectID = childKey;
    // Add object for indexing
    records.push(childData);
  });

  // Add or update new objects
  index
    .saveObjects(records)
    .then(() => {
      console.log('Contacts imported into Algolia');
    })
    .catch(error => {
      console.error('Error when importing contact into Algolia', error);
      process.exit(1);
    });
});
Save the file and run as before:
1
node index.js
Once the program has completed successfully, you can verify in your Algolia dashboard that the contacts are there.
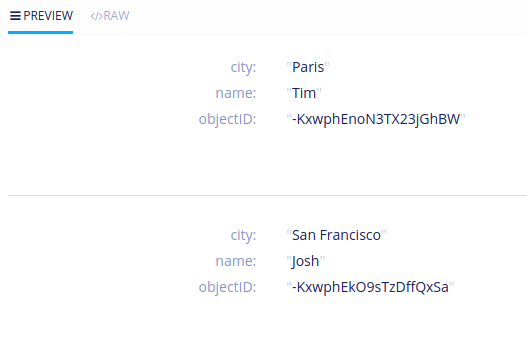
You might have noticed that we’ve set the objectID of our records. The
objectID key is used by Algolia to identify records uniquely. If you push
a record with an objectID that already exists, it will overwrite the
previous record. This way, you can run the script several times and not end up
with duplicates: new records will be added, and old records will be updated.
Ongoing live sync to Algolia
At this stage, you have a script that you can run to copy Firebase data to an Algolia index. In a real application, you will want this synchronization to be done automatically.
To do so, you will have to listen to any change in your Firebase database (contacts added, edited or deleted) and synchronize changes with Algolia.
Remove the initial import code from the previous section and replace it with this:
1
2
3
4
5
6
7
8
9
10
11
12
13
14
15
16
17
18
19
20
21
22
23
24
25
26
27
28
29
30
31
32
33
34
35
36
const contactsRef = database.ref('/contacts');
contactsRef.on('child_added', addOrUpdateIndexRecord);
contactsRef.on('child_changed', addOrUpdateIndexRecord);
contactsRef.on('child_removed', deleteIndexRecord);

function addOrUpdateIndexRecord(contact) {
  // Get Firebase object
  const record = contact.val();
  // Specify Algolia's objectID using the Firebase object key
  record.objectID = contact.key;
  // Add or update object
  index
    .saveObject(record)
    .then(() => {
      console.log('Firebase object indexed in Algolia', record.objectID);
    })
    .catch(error => {
      console.error('Error when indexing contact into Algolia', error);
      process.exit(1);
    });
}

function deleteIndexRecord({key}) {
  // Get Algolia's objectID from the Firebase object key
  const objectID = key;
  // Remove the object from Algolia
  index
    .deleteObject(objectID)
    .then(() => {
      console.log('Firebase object deleted from Algolia', objectID);
    })
    .catch(error => {
      console.error('Error when deleting contact from Algolia', error);
      process.exit(1);
    });
}
Save the file and run as before:
1
node index.js
This code uses the Firebase on method to listen for changes to children, and
then triggers the appropriate method to sync the update to Algolia, whether that
is an add, update or delete.
As long as this script is running, it will catch all changes to your Firebase
data and replicate them into your Algolia index. Press Ctrl-C in your terminal
to close the script.
Hosting your application
Having a script running forever on your machine is going to hit its limits as soon as you have to go in production. Instead, you should have your script hosted somewhere.
Heroku, Nodejitsu, and other providers can help you with that.
Firebase even has Firebase Functions that you can use to directly listen to changes in your Firebase database.
Caveats
The code in this example shows you how to sync one, 1-child deep node of your Firebase tree. It does not automatically index an entire nested Firebase database. However, all of the patterns that you need to do that are in here.
We recommend maintaining a separate set of scripts for indexing your Firebase data the first time or later down the road if you should need to reindex. These will probably look different than the scripts that you use to listen to and index changes regularly in production.
If you do decide that you need a full reindex, but don’t want to clear your production index while your application is live, we recommend creating a new index and indexing your Firebase there first. Then, use a moveIndex operation to rename the new index to the old one. This will avoid any production searches to an index in an incomplete state.
More resources
- algolia-firebase-nodejs: A repository that contains the code in this tutorial, broken out into separate files depending on the action. If you get stuck during the tutorial, have a look here.
- firebase-function-sample: A repository that shows how to use Algolia with Cloud functions for Firebase.
- Cloud Firestore: A guide to use Algolia with Firebase’s Cloud Firestore
- Algolia With Firebase Cloud Functions: Screencast of integrating Algolia with Firebase Functions
